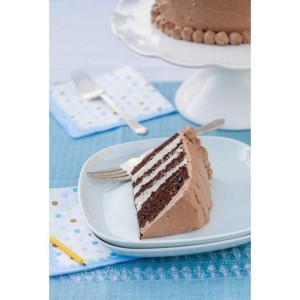
Chocolate Layer Cake
Prep Time: 40 minutes
Cooking Time: 30 minutes
Yield: 8 to 10 servings
- 6 Eggs at room temperature
- ½ cup Honey
- ¼ cup coconut oil, melted, plus more for greasing the pans
- ¼ cup coconut milk
- 1 ½ teaspoons pure vanilla extract
- ¾ cup blanched almond flour
- 1/3 cup coconut flour
- 1/3 cup cocoa powder
- 1 teaspoon baking soda
- ½ teaspoon sea salt
- ¼ cup dairy-free chocolate chips
- Preheat oven to 325 degrees F
- Place the eggs, honey, oil, coconut milk and vanilla in a food processor and process until fully combined.
- Sift the flours, cocoa powder, baking soda and salt into a bowl, then add to the wet ingredients. Process until smooth, about 30 seconds. Let the batter rest for 10 minutes. Stir in the chocolate chips.
- Grease 2 6 inch cake pans. Cut 2 circles of parchment paper and fit them to the bottoms of the pans.
- Evenly divide the batter between the two pans, lightly smoothing the tops with a spatula. Bake, rotating the pans halfway through, until a cake tester inserted in the centers comes out clean, 28 to 30 minutes. Transfer the pans to a wire rack for 20 minutes to cool. Invert the cakes onto the rack, releasing them from the pans; peel off the parchment paper. Cool the cakes right-side-up until room temperature.
- Assemble the cake. Slice each cake in half horizontally. Set aside the best looking dome for the top of the cake. Use the other dome for the bottom layer of the cake and place it dome side down on a cake stand or plate. Top with ¼ cup of Vanilla Frosting, spreading evenly. Place the second cake layer on top and spread with another ¼ cup of frosting. Repeat with the third layer; top with the final dome.
- Spread the Chocolate Swiss Meringue over the entire cake, swirling with a knife to create a decorative finish or piping with a pastry bag. Serve immediately or cover and refrigerate. If chilled, let sit at room temperature for about 20 minutes before serving.
Vanilla Frosting:
Prep Time: 15 minutes
Yield: 2 cups
- ¾ cup palm shortening
- 1 13.5- ounce can coconut milk, refrigerated overnight
- ½ cup honey
- 3 teaspoons coconut flour, sifted
- 1 teaspoon vanilla extract
- Gently open the can of coconut milk and scoop off ½ the cup of cold cream that had risen solidified at the top of the can. In a sand mixer or using electric hand beaters, beat the shortening and cream on high until thick, about 5 minutes
- Add the honey, coconut flour, and vanilla, and beat again until incorporated. Refrigerate for 20 minutes before spreading or piping onto cake
Chocolate Swiss Meringue Buttercream:
Prep Time: 15 minutes
Cooking Time: 5 minutes
- ¾ cup honey
- 4 large egg whites, about ½ cup
- ¼ teaspoon sea salt
- ¼ teaspoon lemon juice
- 2 tablespoons unsweetened cocoa powder, sifted
- ¾ cup palm shortening, softened
- ¾ teaspoon pure vanilla extract
- 3 ½ ounces dark chocolate, melted and cooled to room temperature
- Place 2 inches of water in saucepan and bring to a simmer. Place the honey, egg whites and salt in a large heatproof mixing bowl and stir to combine. Set the bowl over (not in) the simmering water, and whisk until whites are warm to the touch and honey is incorporated, 4 to 6 minutes, or until a candy thermometer reads 150 degrees F.
- Transfer to a stand mixer, or use a hand mixer, and beat on low until foamy. Add the lemon juice, and beat on medium-high until stiff, glossy peaks form and the mixture has cooled completely, about 12 minutes.
- Mix in the sifted cocoa powder
- Reduce the speed to medium-low and add the shortening a spoonful at a time, beating to incorporate fully after each addition. The buttercream will appear curdled at this point but will continue to smooth again with continued beating. After all the shortening has been incorporated, add the vanilla and continue beating for 10 to 15 minutes. Place frosting in the refrigerator for 20 minutes
- Remove from the refrigerator and return the bowl to the mixer. With the machine still running, slowly drizzle in the chocolate. Beat until smooth and the frosting has thickened
Recipe taken from Practical Paleo by Diane Sanfilippo
For more recipes or health information visit Brooks Chiropractic’s Blog
